Guide
How to set up a packing station
Camera, lighting and layout for clear packing videos
A packing video is only useful if it shows what you need to see: the items going into the box, the padding and the shipping label. That depends less on the camera you buy than on where you put it. This guide walks through one packing station: the equipment, the camera position, the lighting, and a short test before you go live.
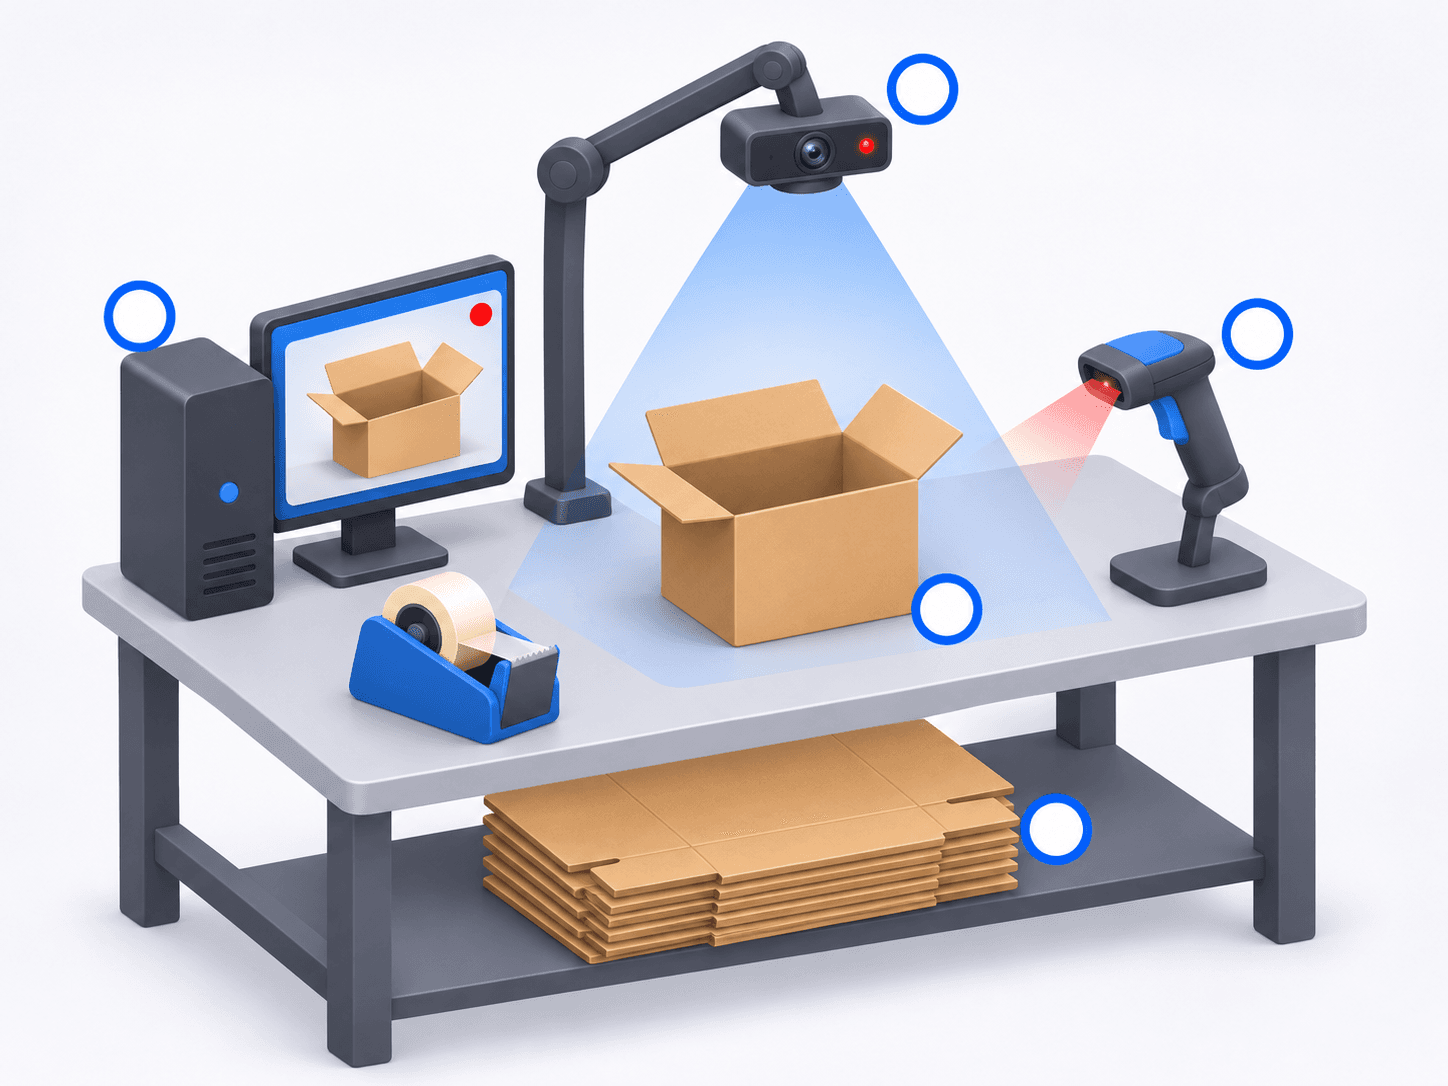
What one packing station needs
Each packing station has its own PC, camera and scanner. The numbers match the picture above.
Camera
A USB webcam on an arm, a clamp or a shelf above the table, pointing down at the work area. The recording app records in 720p by default and can be set to 1080p. A webcam with autofocus helps keep labels sharp.
PC and monitor
A Windows 10/11 PC runs the recording app. Put the monitor where the packer can see at a glance that recording has started, but out of the way of the work.
Barcode scanner
A USB barcode scanner within reach of the hand that picks up the packing slip. One scan starts the recording and a second scan ends it.
Work area
The part of the table the camera sees. Everything that matters happens here: items are shown, padding is added, the box is sealed and the label is applied. Mark its corners with tape so packers know where the picture ends.
Boxes and supplies
Boxes, padding and tape stay within reach but outside the picture, so they do not cover the order being packed.
The PC also needs an internet connection. Videos are saved on the PC first and then uploaded to the cloud automatically.
Where to put the camera
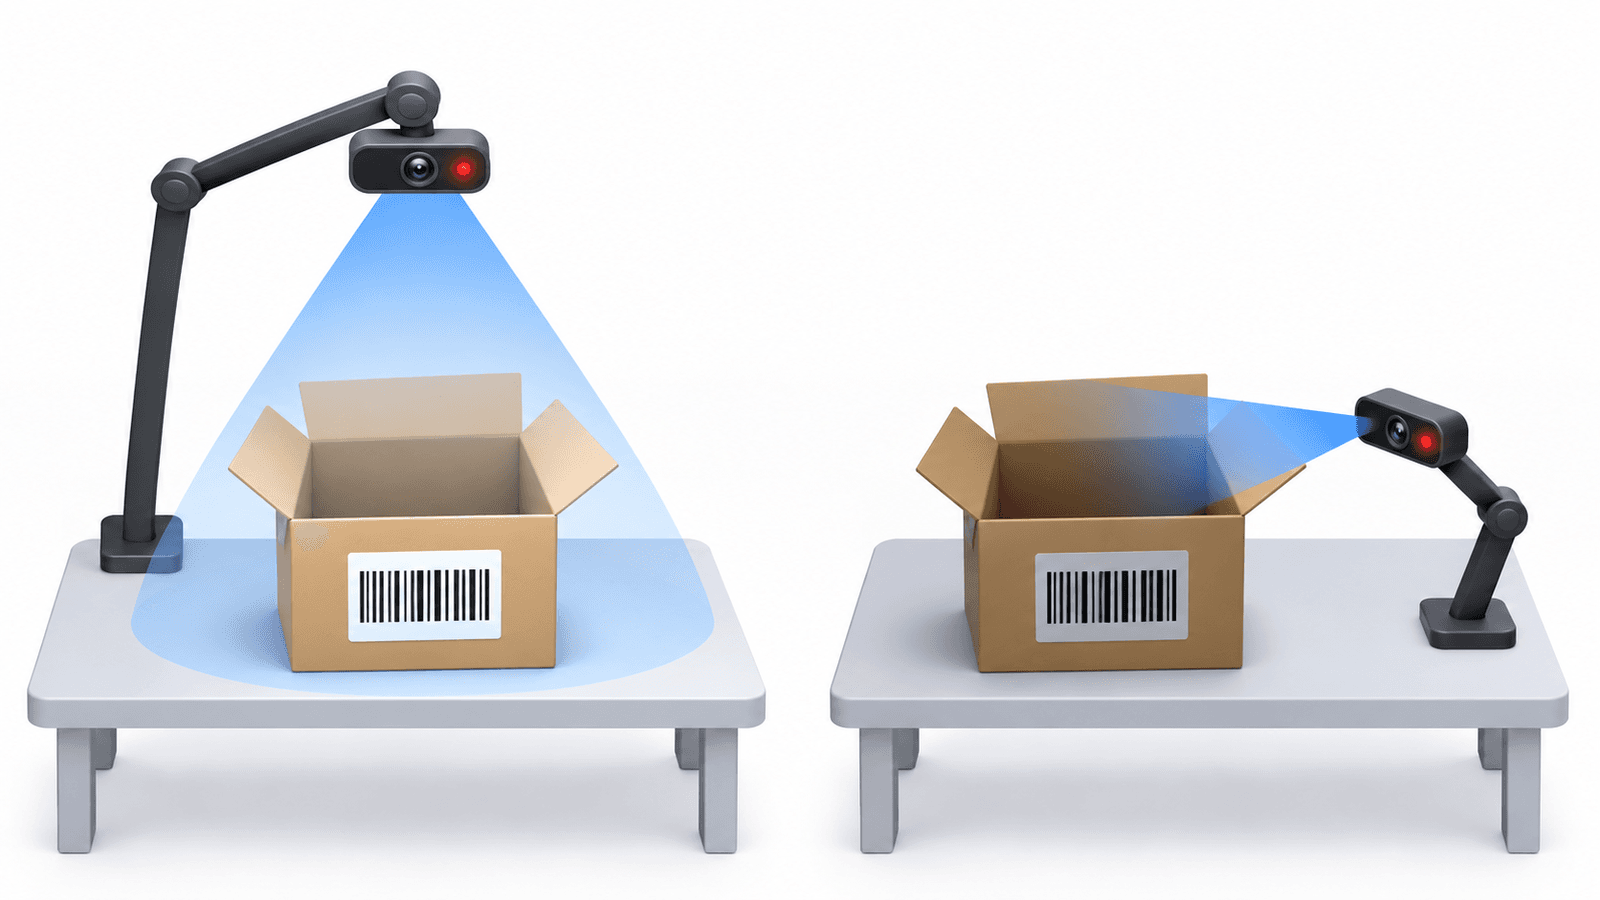
Mount the camera above the table and point it down at the work area. From above, the camera sees into the open box. From the side, the box wall and its flaps hide exactly the moment you want on video.
- Height. As a rule of thumb, a common webcam with a 78° lens mounted about 70 cm (28 in) above the table sees an area about 1 m (39 in) wide. Go higher for large boxes and lower for small items. Measure from the top of your tallest box, not from the table: the box top is closer to the lens, so less of it fits in the picture.
- Angle. Straight down works for most stations. If labels go on the side of the box, tilt the camera a little so the label faces it.
- Picture. The whole box and the shipping label should be in the picture with a margin around them. Hands and tools should not have to leave it during normal work.
- Only the work area. Aim at the table, not at people or the rest of the room. The video needs the order, not the face of the person packing it.
- Fix it firmly. A camera that gets bumped keeps recording the wrong part of the table. Clamp the arm and tie down the cable.
Lighting
When a label or a model number cannot be read in a video, the cause is often the light rather than the camera.
- Light the table evenly from above. A ceiling light or an LED bar over the station is enough.
- Watch for glare. Glossy tape, poly bags and shrink wrap reflect a light placed right next to the lens. Move the light to the side until the reflection is off the label.
- Keep direct sunlight off the table. Bright patches and hard shadows move through the day, and a camera cannot show both well at once.
- Check the picture at the hours you actually pack, such as early morning or a night shift.
A packing routine the camera can follow
The same order of movements at every station makes videos easy to check later.
Scan
Scan the barcode on the packing slip or shipping label. Recording starts.
Show the items
Place each item in the work area before it goes into the box. For expensive items, hold the model name or serial number up to the camera for a second.
Pack and seal
Add the padding, close the box and tape it inside the picture.
Show the label
Apply the shipping label and leave the sealed box in the picture for a moment.
Scan again
Recording stops and the video uploads by itself.
Test before you go live
Record one test order, find it on the videos page by its number, and check it on the screen you normally use:
- Can you read the shipping label?
- Can you tell one item from another, and count them?
- Is the whole box in the picture, from the first item to the sealed label?
- Is anything in the picture that should not be: a face, another order, a screen showing customer details?
If the label is hard to read, lower the camera or change the recording quality to 1080p in the app settings, then test again.
More than one station
Set up the first station, test it, then copy the same layout to the others. Videos from all stations are searched together in one account.
Next: how per-order videos differ from CCTV and how to record return inspections at the same station.
Set up your first station today
With a Windows PC, a USB webcam and a barcode scanner you can record your first packing video today. Try it with the 15-day free trial.
US$29.99 per packing station per month · Annual plan: US$299.90 for 12 months · pay for 10 months